


Table of contents:
Recording a webinar makes your content live beyond the live event.
Whether you want to create promotional clips or send your recording to registrants who couldn’t make it- you’ll want to know how to record in high quality.
This guide breaks down everything. We’ll show you how to record a webinar step-by-step, whether hosting the session or attending as a viewer.
How to record a webinar: Step-by-step
Ready to roll with me? Here are the steps you need to record a memorable webinar in no time.
Choose the equipment to record your webinar
You can record a webinar with as little as the built-in camera on your laptop. But if you’re looking for a more professional production, adding a few additional pieces of equipment can help. Thankfully, there are lots of affordable options these days. Let’s take a look.
Camera
You’ll definitely need a camera to record a webinar. Most beginners choose a webcam.
You’ll want to choose one with higher resolution if you can. While 720p is common, recording in 1080p is considerably better (and 4K is top notch!). This also makes it easier to resize your videos without losing quality.
Check out our top picks for best webcams for more options.
Microphone
A dedicated microphone can make a huge difference in the audio quality of your presentation. And you can get a decent mic for less than $100!
If you’re just getting started, we recommend a USB microphone. They’re convenient and inexpensive. You’ll also want to look for something that falls in the frequency range of 80 Hz and 255 Hz. This will ensure that you pick up both male and female voices well.
Check out our top picks for best microphones for computers for recommendations.
Headphones
Wearing headphones can greatly improve the audio quality of your webinar (and it’s great if your guests do the same!)
By wearing headphones, you can better monitor and adjust the sound quality of your webinar. You’ll also be able to block out external distractions that could keep you from being 100% present.
Look for headphones that are comfortable and have a wider frequency range for more accurate sound production.
Discover some great options in our list of the best podcast headphones.
Other equipment
There are a few other pieces of equipment that can make your podcast look and feel more professional. Here are a few to consider:
- Lighting: A dedicated lighting source can provide uniform lighting and reduce shadows. (It’ll also make you look a lot better!)
- Tripod: A tripod can ensure stable positioning of your camera or lights. This eliminates camera shake, making for better footage.
- Pop filter: This handy device is used with a microphone to prevent those irritating popping sounds that can occur when people pronounce letters like “p” or “b,” causing air to be blown across the mic.
- Backdrop or green screen: A clear, uncluttered background will help make your presentation shine. While a green screen allows for a customizable background, a solid screen or backdrop is a simpler, less expensive option.
Choose a webinar recording platform
Next up, choosing a webinar recording platform. This is software you will use to host and record your webinar. When choosing a webinar platform, the key things you want to consider are:
- Number of attendees: This varies widely between platforms. Plus, many platforms base their pricing around attendee limits. Consider what you need right now and are likely to need in the near to medium term. Then, balance this with your budget.
- Usability: Some webinar recording platforms are much easier to use than others. Check out videos and user reviews of the options you’re considering, and sign up for free trials or free versions whenever possible. If you can get all the same features without the frustration, why wouldn’t you?
- Recording quality: When it comes to recording, quality counts, so look for webinar platforms that can record in at least 1080p.
- Features: Each webinar recording platform has different features. Are audience interaction features important to you? What about editing tools for your final product? Assess the features of each platform you’re considering and decide which ones will best contribute to your webinar goals.
Webinar recording software recommendations:
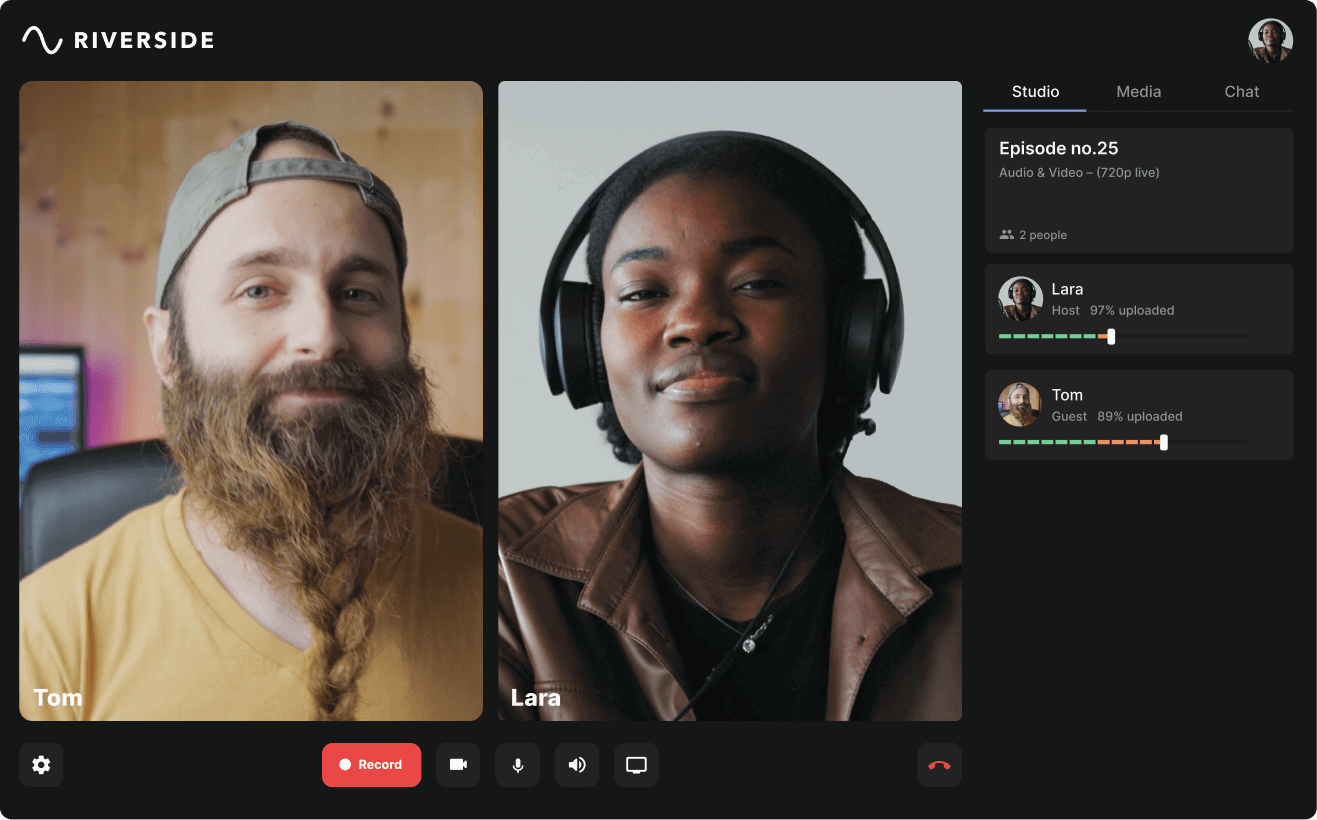
Riverside
%2520(1).png)
For an all-in-one platform, I recommend Riverside. You can live stream your webinar content, record it in up to 4K, and then edit your recording directly in the platform.
Riverside makes professional-level recording fast and easy, and you’ll get everything you need to host a great webinar from start to finish. You can easily invite audience members (Riverside allows up to 10,000!) by email or a link, track signups in real time, and even connect and sync with HubSpot. Check out How to Run a Webinar with Riverside to learn more.
With Riverside, hosts can:
- Invite up to 10 speakers and 10,000 attendees via email or a shareable link.
- Multistream to platforms like YouTube, LinkedIn, and Facebook.
- Record separate audio and video tracks for each speaker — making editing easier.
- Edit recordings right inside Riverside with simple, text-based editing, captions, and overlays.
- Engage viewers with built-in tools like live chat, Q&A, and audience call-ins.
- Repurpose your webinar instantly with Magic Clips, which automatically turns highlights into short, shareable videos.
WebinarJam
.png)
If you’re looking to focus on automated webinars, WebinarJam is a top choice. This platform also has lots of great engagement features, like live chat, Q&A, and sticky announcements. WebinarJam’s customizable registration templates are also impressive.
The downside is that WebinarJam can get very pricey, especially for larger audience sizes.
WorkCast
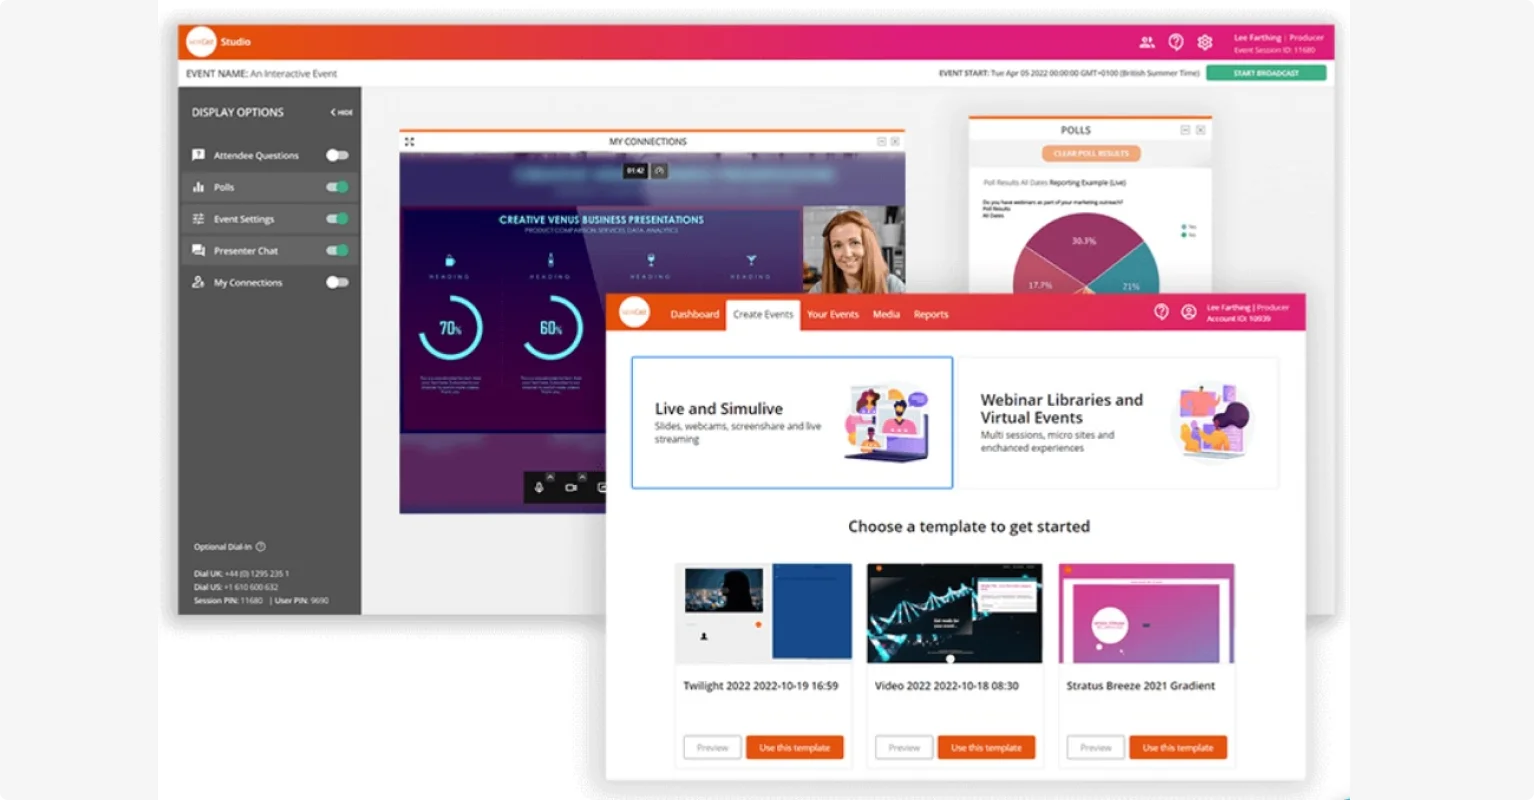
For simulive webinars, or webinars that combine live and pre-recorded segments, WorkCast is a platform worth looking at.
Workcast has great features for audience engagement, and allows you to configure your recording studio for simulive broadcast. You can easily attach pre-recorded media to your event, and schedule time for live interaction as well.
Get more great webinar recording software options in our list of best webinar software and, for the budget conscious, best free webinar software.

Set up your webinar recording
Once you have your webinar recording platform, it’s time to get set up to record. And when I say “get set up,” I don’t mean jump in front of the camera and hit “Record!” Here are a few things to do first:
- Select a date and time. I recommend scheduling your webinar at least two weeks in advance so you have time to promote your event. You can also create a registration page to make sign ups easier.
- Choose your webinar format. Consider what you want the event to look like, including who will be presenting. This will give you time to find and invite any guests.
- Invite guests. Invite any guests or speakers to your podcast. On Riverside, you can do this easily by sending them a link from your Riverside studio.
- Develop content and materials. You don’t want to leave this one to the last minute! Start putting your presentation together as soon as possible to give yourself enough time - and give you time to get feedback from friends or colleagues.
- Promote the webinar. Use email campaigns, social media, promotion on your website, and anything else you can think of to get the word out to your potential audience.
- Rehearse, rehearse, rehearse! I recommend always doing a dry run about a week before your webinar. This will help you (and anyone else presenting) to get comfortable with your chosen platform, the format, and the material being presented. It can also help prevent jitters on the big day!
- Check your setup. Ensure all equipment, such as microphones, cameras, and your internet connection are working properly. You can use Riverside’s mic test and webcam test to speed this up.
- Check it again! Before you go live on your recording, do one last check. Always.
Record your webinar
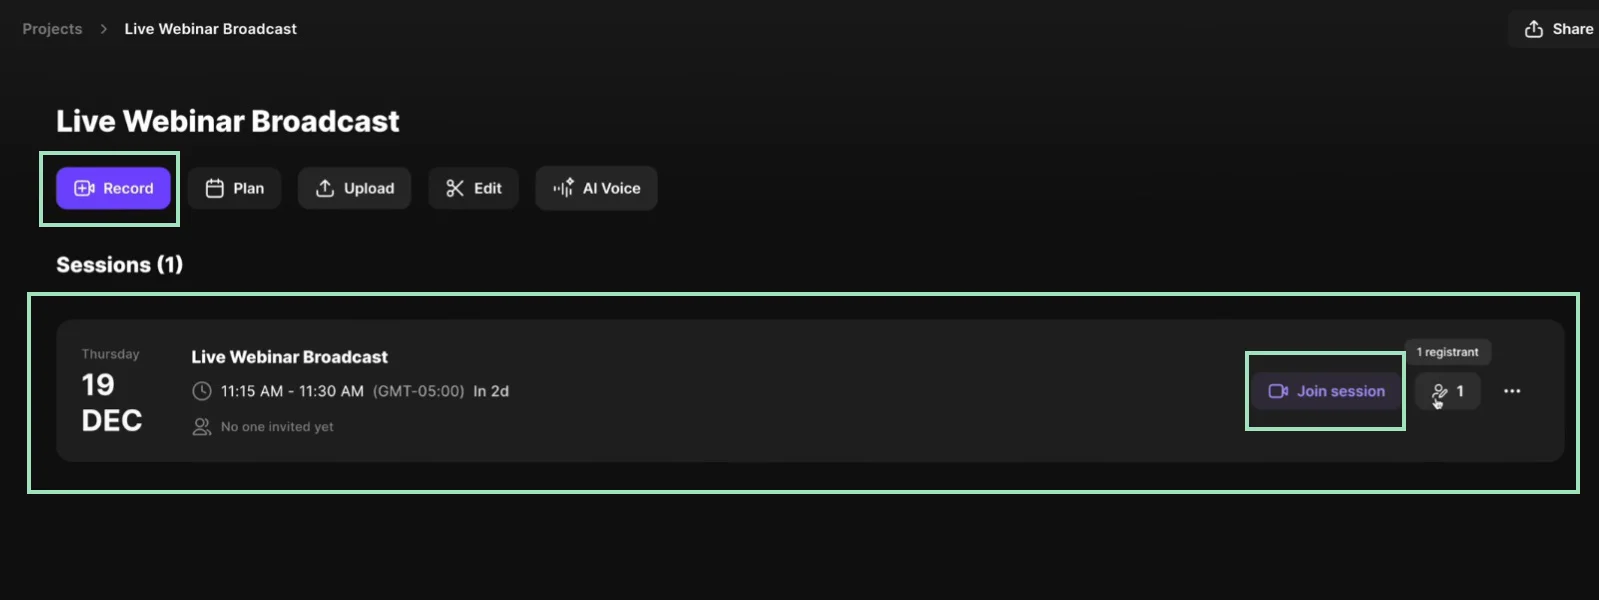
When the big day arrives, it’s time to present and record your webinar. Here’s how to do it on Riverside.
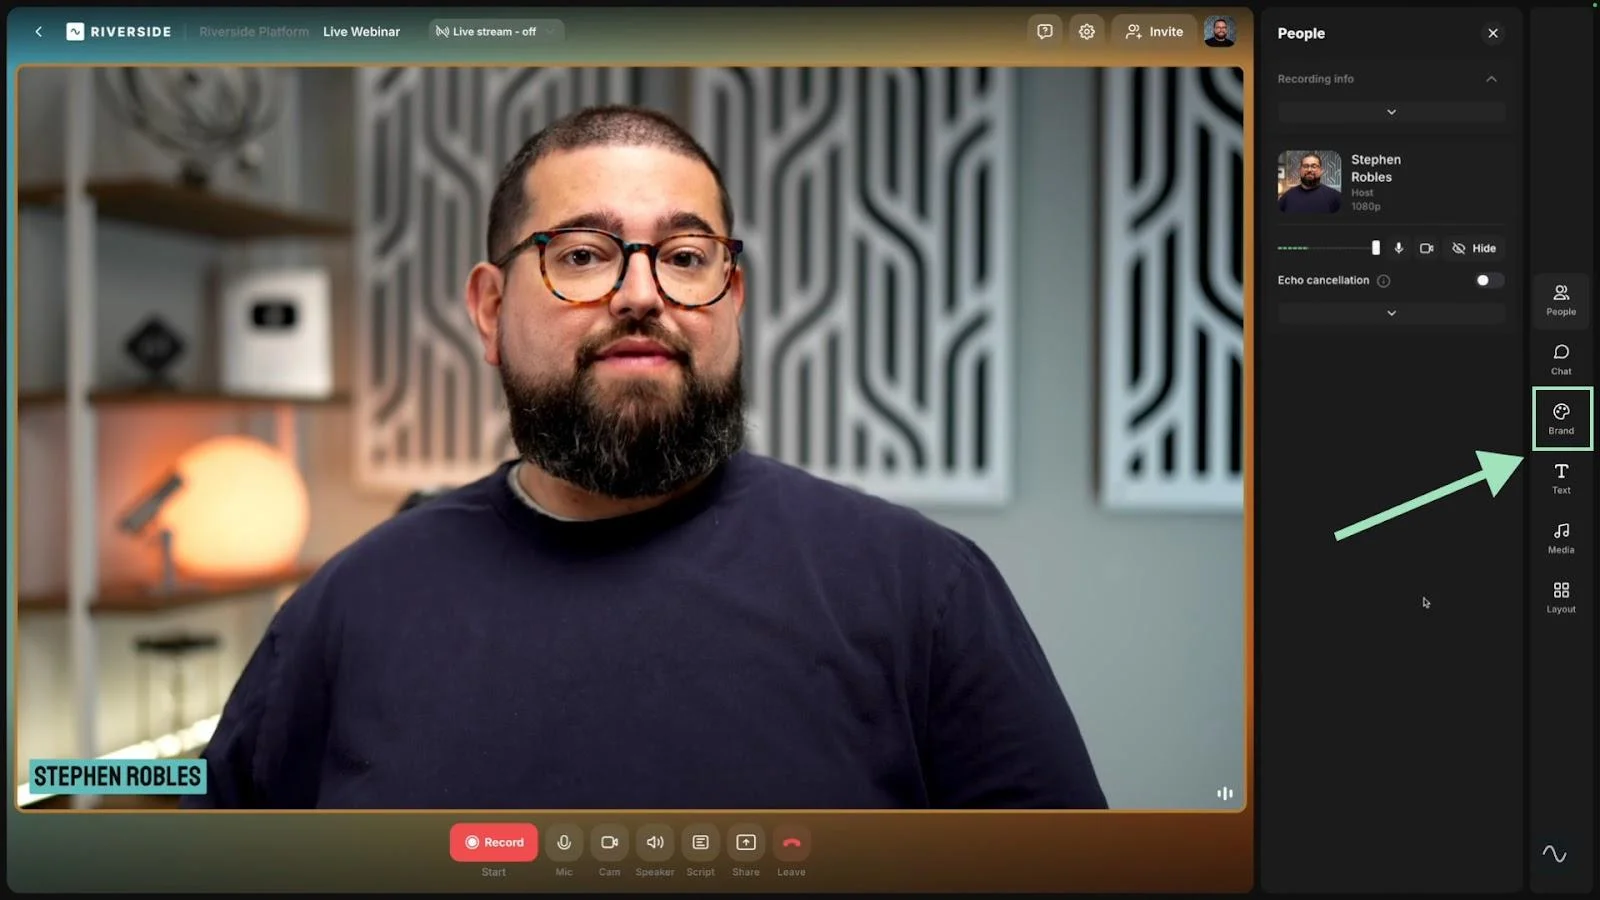
Step 1: Set up your studio and customize branding. You can do this by heading to your session and clicking the “Record” button.
Then, click the “Brand” tab to adjust branding in your studio and (optionally) your studio lobby.
Step 2: Add any media you plan to share during your webinar. You can upload images, video, and sound clips. Riverside also has music, sound and video clips you can use. Click the “Media” button on the right sidebar to upload and view media.
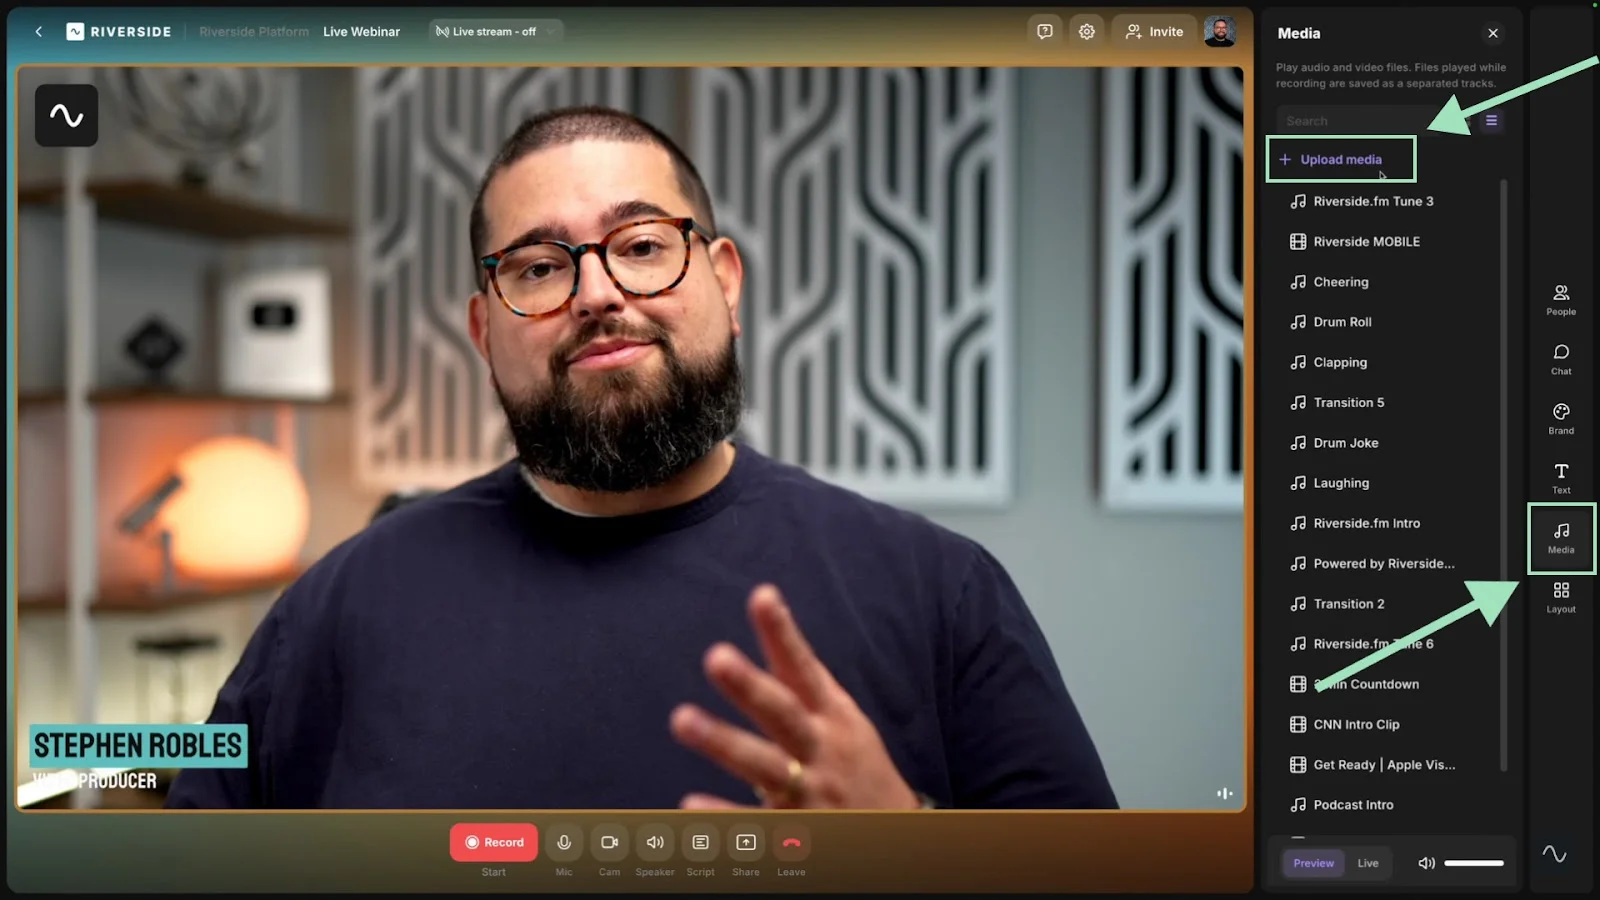
To add a presentation, click “Share” on the bottom toolbar, then “Presentation.”

Step 3: If you’d like to use a script for your event, you can upload one by clicking the “Script” button. This will allow you to easily read from your script using Riverside’s built-in teleprompter.
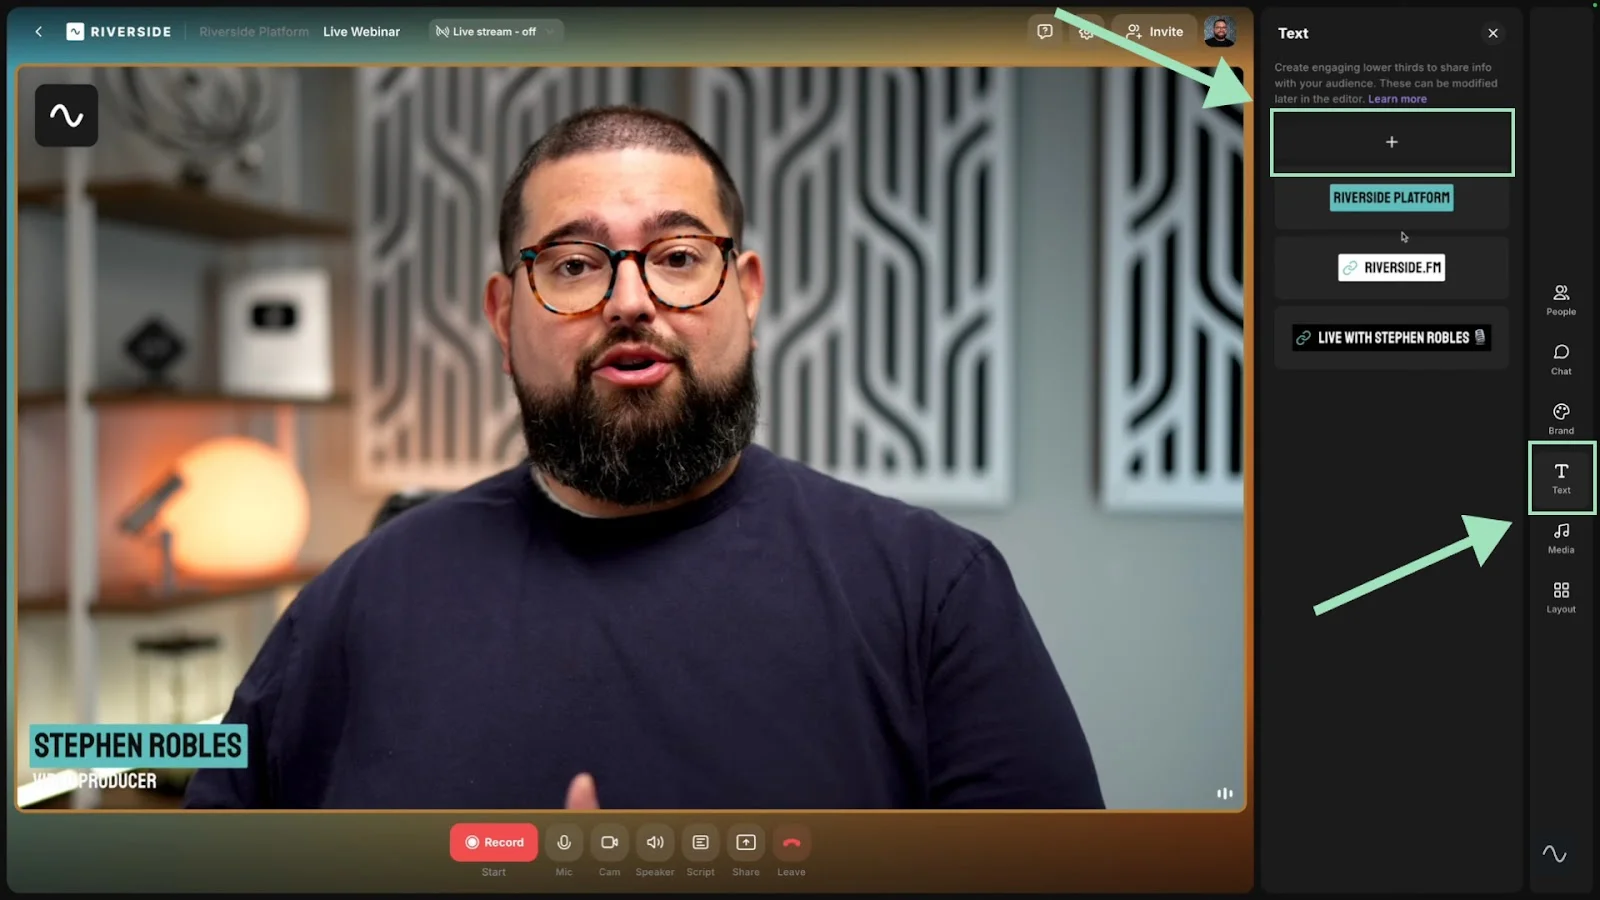
Step 4: Next, create and customize lower thirds for you and your guests by clicking the “Text” icon on your right-hand toolbar, then the “+” icon to add a new lower third. You can add a logo, change style, color, and placement, and add a link.
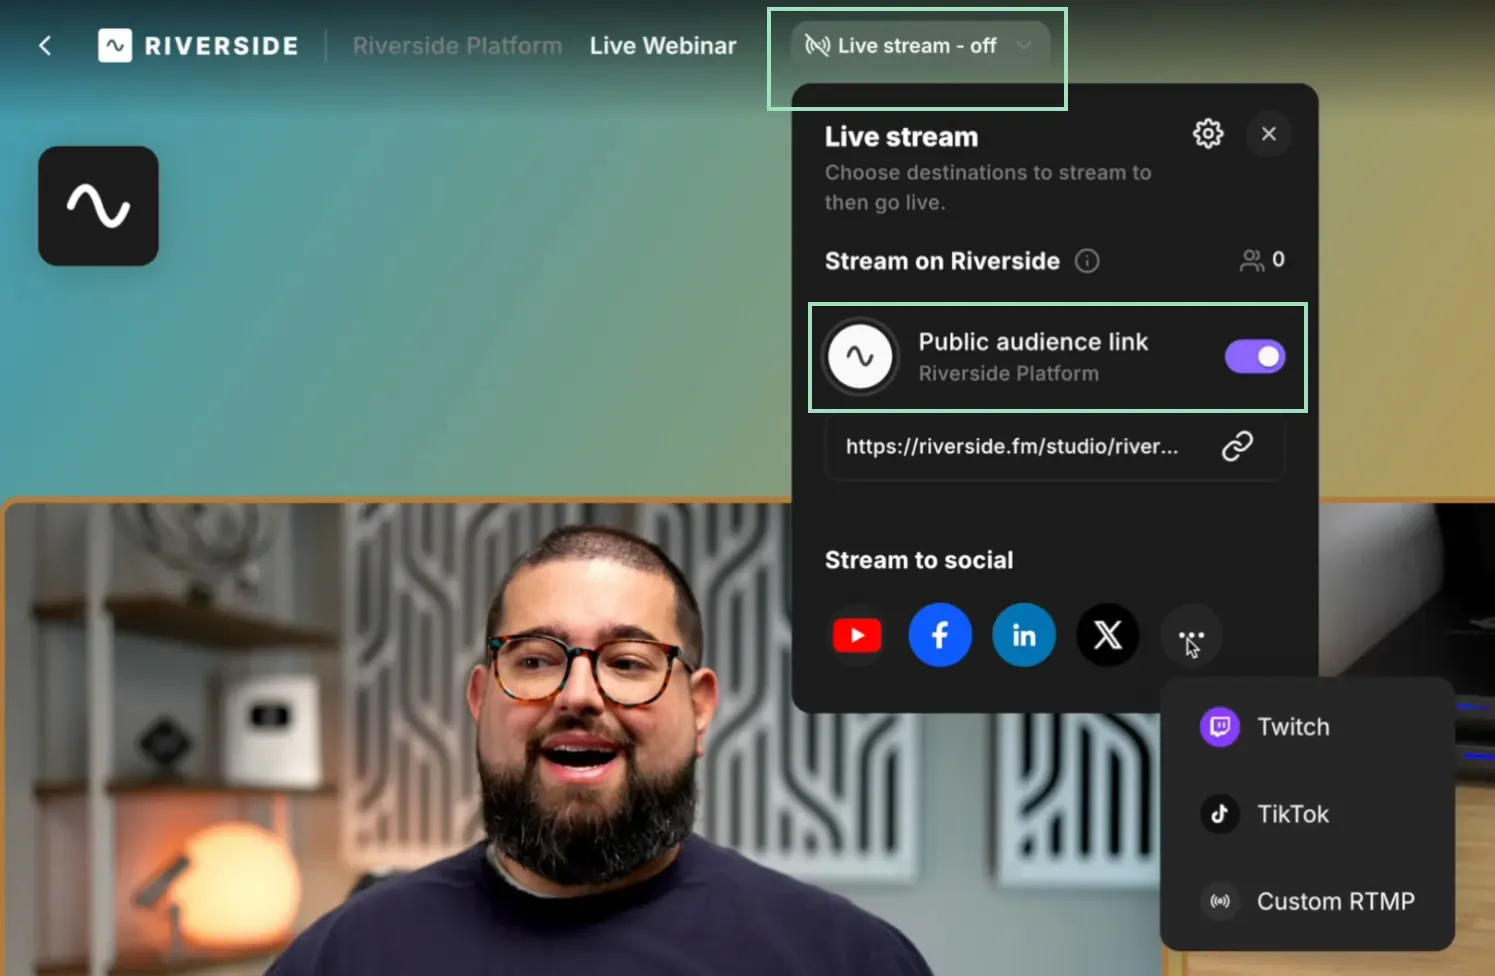
Step 5: Set up live streaming. This one’s optional, but if you’re doing a live broadcast, you can multistream to top social media platforms right from your Riverside studio.
Click the “Live Stream” button at the top of your screen and ensure the “Public audience link” toggle is turned on. Then, select the platforms you’d like to stream to.
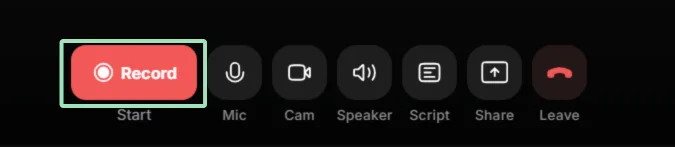
Step 6: Now for the big moment - it’s time to record and go live! This part’s easy. Just hit the “Record” or “Go Live” button. You’ll get a five-second countdown before your recording (and live session!) begins.
Step 7: Once your webinar is up and running, you can use Riverside’s interactive features to engage with a live audience. Use the chat box to chat with participants from across various platforms. You can even take live call-ins from audience members.
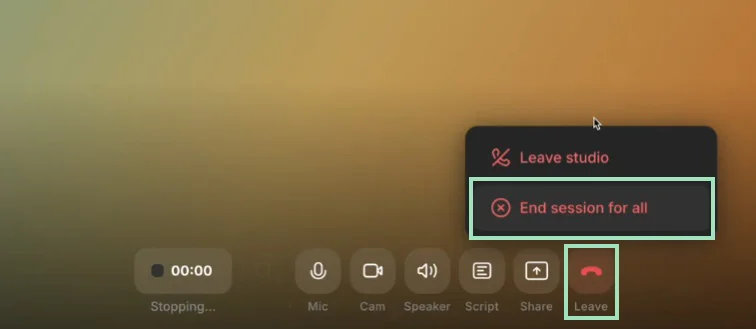
Step 8: When your webinar is over, it’s time to stop the recording. You can do this by clicking the “Leave” button at the bottom of the screen, and then “End session for all.” This will end the recording and, if you’re running a live stream, that will stop as well.
Pro tip: Remember to ask each guest to leave their studio open until their content has fully uploaded (it only takes a few minutes!)
Edit and repurpose your webinar
Because Riverside is an all-in-one solution, you can use it to edit and repurpose your content when your webinar is over. Here are a few things you can do:
- Edit faster with text-based editing: Cut out parts of your recording by deleting text in your recording transcript.
- Polish audio automatically: Use AI-powered tools to enhance sound, remove noise, cut filler words, and normalize audio levels.
- Create social clips in seconds: Use our Clips creator to turn the best moments of your webinar into social media-friendly short videos.
- Add captions with one click: Add dynamic captions to your webinar recording and style them as you like.
- Customize your layout: Choose how speakers and content appear in the final video.
- Repurpose your content: Turn your full transcript and AI summary into blog posts or additional content.
- Brand up your recording: Add b-roll, text, image, and music overlays to spice up your recording - or even add your own logo.
How to record an online webinar as an attendee
If you attend a webinar, you might be interested in recording it for later use. Many webinar hosts send recordings after the event, but if you want to record the event yourself, a screen recorder is your best option.
Keep in mind that recording someone else’s content without permission may violate copyright laws or platform terms. Always check with the host first.
Here’s how to do it.
Step 1: Download a reliable screen recorder. We recommend screen recording software that captures at least 720p HD resolution.
Step 2: Set up your recording to capture the right window. This might involve sharing your screen on your recording platform, or adjusting settings so your software captures the right window.
Step 3: Start recording the webinar you are attending. It’s best to make sure you have permission to record - remember, this is someone else’s content!
Step 4: Download your webinar recording.
The steps above might be different based on the software you’re using, especially in terms of setup. To get more tips, check out How to Screen Record on Any Device.
FAQs on how to record a webinar
Still looking for information? Here are the answers to some frequently asked questions.
How can I record a webinar for free?
There are lots of free webinar recording platforms you can use to record a webinar for free. These include Riverside, Google Meet, and Zoho Meeting.
Remember to check recording quality and audience member limits on free plans, as they can be really limited. You could also try a screen recorder like OBS Studio, but consider whether you want to only record your screen or screen and webcam. Note that the recording quality for this option may not be as high.
What types of webinars can you record?
There are a few key types of webinars. They are:
- Live webinars: A live webinar is an event that happens in real time in front of an audience. It’s a dynamic format that allows for real-time audience engagement. But, because it’s live, any bloopers will be too.
- Automatic webinars: Automated webinars are pre-recorded presentations that are shared at certain times as though they were live. This can be a way to build audience hype while still having the convenience of providing a recorded presentation.
- Pre-recorded webinars: Pre-recorded webinars are recorded in advance and made available on-demand. This is often provided as an additional option after a live event. It can also be a good option for evergreen content like training materials.
- Simulive webinars: Simulive, or simulated live, webinars combine elements of live and pre-recorded webinars. Many simulive webinars use a pre-recorded presentation, but have live Q&A or interaction with speakers at the end of the event. This allows you to have a very polished presentation while still getting the benefit of audience interaction.
Can you record a webinar if you’re not the host?
Yes, you can record a webinar as an attendee by using screen recording software. Legally though, you need to make sure you have permission to record a webinar that isn’t yours.
We’ve provided some instructions on how to do that above.
How do I record audio from a webinar?
If you’re using webinar recording software, you may be able to download the audio track of your recording, even if you recorded both audio and video. (Riverside provides separate audio and video tracks for each recording.)
You can also use third-party screen recording software like Movavi Screen Recorder, QuickTime Player (macOS), or Windows Game Bar. Otter.ai can also record and transcribe audio from external platforms like Zoom, Google Meet, and Microsoft Teams. Finally, you can always use an external recording device or mobile app!
Does Windows have a screen recorder?
There are lots of options for screen recording on Windows computers. Built-in options include the Snipping Tool and XBox Game Bar. Check out How to Screen Record in Windows for more details.


.webp)
-(1).png)
.webp)


.png)

