%20(1).png)


Table of contents:
Before you start recording your podcast
What podcast equipment do I need to record a podcast?
What software do I need to record a podcast?
How to record a podcast: 3 Methods
How to record a podcast from different locations (using Riverside)
How to record a podcast interview offline
How to record a podcast with a Phone
You don’t need a high-end studio or years of audio engineering to create a professional podcast.
I'm Stephen Robles, co-host of the Primary Technology show, a regular in Apple Podcasts' top tech shows.

With 15+ years of experience, I’m sharing my advice on how to record a podcast professionally. (It’s easier than you think.)
Let's roll!
Before you start recording your podcast
In my experience, a solid plan steers you in a consistent direction and keeps the flow.
We’ve got a full guide on podcast planning, but let’s touch on the basics:
Plan your podcast episodes
Whilst some podcasters may enjoy recording on the fly, having a pre-prepared plan of action alleviates stress. Plus, it means things should run smoothly on recording day!
- Plan the general flow and structure of your episode ahead of time.
- Note down anything you need to include or mention: for eg, stats or quotes.
- Consider your timings and the duration of your episode.
- If you’ve got guests, prepare questions and discussion points before recording.
- Leave room for natural moments — listeners want you, not just a script.
Expert tip: I have a template document for different segments of each episode. I’ll use this to start researching and saving resources.
If you’re working with a co-host like me, hop on a call before you go live and make sure you’re on the same page with everything.
Invite your guests
If you intend to include guest participants in your podcast, invite them in advance. There’s nothing worse than planning an episode with someone in particular in mind...only to find their diary is full.
Keep in mind that experienced guests will not always give you the best interviews, it’s the people with the best energy. Make sure your guests bring value to your ideal listener.
Read more: Best practices for interviewing guests
What equipment do I need to record a podcast?
Not quite sure what you need to record a podcast? Get your starter-kit together and make sure to get your hands on the following:
Microphones for podcast recording
Choosing a podcasting microphone can be overwhelming. There’s a lot of technical jargon that gets thrown around. Just remember, at the end of the day, you need a microphone that works for you.
If you’re into the technical side of things, here are a couple of things you should consider before purchasing a microphone:
The Polar Pattern: The polar pattern tells you how much sound a microphone picks up from every given direction.
- Cardioid mics pick up noise from the front and are better for noisier environments.
- Omnidirectional mics pick up noise from all directions and are better for a sound-treated, quiet studio.
Dynamic vs Condenser Mics: This refers to how a mic captures sound.
- Dynamic mics capture less detail and reduce background noise.
- Condenser mics are more sensitive and capture crisp, delicate sound.
Plug-in extensions:
- USB mics are more portable, affordable, and don’t have a complicated setup.
- XLR mics record in better quality and are more flexible for recording with multiple people in one place.
Recommendations:
I suggest the ATR 2100X for beginners, which delivers great sound with minimal setup. It works with both USB and XLR, so you can start simple and upgrade your gear later.
Ready to level up? The Shure MV7+ is your go-to for pro-quality sound with advanced controls for tone and gain.
What to consider when recording:
- Keep your mic 3 to 8 inches from your mouth. Too close, and you’ll sound distorted, too far, and you’ll sound distant.
- Find the right angle. Point the mic at your mouth at a slight 45-degree angle instead of straight on. This cuts harsh “P” and “B” sounds.
- Use a windscreen or pop filter. It’s a small investment that saves you hours in editing.
- Stay consistent. Keep your mic in the same position every time you record so your sound stays even.
- Learn your mic’s personality. After a few recordings, you’ll figure out how to work your mic — when to lean in for intimacy or pull back for emphasis.
If you’re keen for more information, try our in-depth guides:
- Choosing a Podcast Microphone
- 9 Best Podcast Microphones For Every Need and Budget (2024)
- Gear Setups for Riverside: Starter & Advanced Video Setups (I’ll show you exactly how to set up your mic in this video.)
Podcast recording cameras
Do you really need to buy a podcast camera?
With a top-quality camera like an iPhone, I actually don’t think you need to. Here’s my hack for high-resolution video with an iPhone:
This works for a secondary camera for extra angles, too. If you’re using Riverside, set up your main camera on your desktop and your camera through the app.
If you do want a camera, here’s what to consider:
- Resolution: Resolution refers to the detail in each video frame. It’s best to record in high-definition with a minimum of 1080p, or even 4K.
- Frame Rate: The number of stills a camera captures every second is a frame rate. A higher frame rate means smoother movement. Aim for anything between 24-60 frames per second.
- Budget: Your budget will determine what kind of camera you should be looking at.
- Portability: If you’re constantly on the move, you should choose a camera that is light and compact. (You can actually record great quality with just a phone camera).
- Low light performance: If you know you don’t have the best lighting, consider choosing a camera that can handle low-lighting conditions
Read more: How to choose your podcast camera in our guide.
Recommendations:
A budget-friendly quality camera like the Logitech C920 webcam can work just fine when you're starting out. If you’re willing to spend, the Sony A6400 can launch you in the pro league. It has excellent image quality, interchangeable lenses, and works great in lower light.
Setting up a camera for recording:
When setting up your camera, focus on the usual basics: Set autofocus, white balance, shutter speed, aperture, and exposure before recording.
Learn more with my full guide on setting up a camera for video podcast recordings.
Headphones
Headphones are a must-have for podcasting (and editing). They help you monitor your audio closely and make any necessary adjustments.
Here’s what to think about when choosing the perfect pair for you:
- Comfort: You’ll be wearing your headphones for hours at a time. Look for headphones that are adjustable and lightweight with a good level of padding.
- Budget: Knowing what your budget is before looking at your options will make the decision a lot easier.
- Sound Isolation: You want a pair of headphones that block out ambient noise that is irrelevant to you and your recording. But, avoid active sound-canceling headphones because these negatively affect the quality of the audio you hear.
- Wired or wireless: I prefer wired headphones because there’s less latency or lag between the audio you’re recording vs hearing.
- Frequency Response: This shows how well a pair of headphones can reproduce sounds at every frequency level. Ideally, you’re looking for a frequency response range of 20 - 20,000 Hz.
Recommendations:
I suggest the Shure SE215 PRO earphones, which are under $100. They’re discreet and sound-isolating, so you can hear your own voice and your guests. Your AirPods or other basic headphones will work fine if you're on a tighter budget.
And if you’ve got some cash to splash? You can try a pair like the Shure SRH940.
Read more: The 11 Best Podcast Headphones
Podcast recording studio and soundproofing
Don’t have access to a professional recording studio? Don’t panic just yet. You can set up a professional podcast setup at home.
I walk you through everything in my video on setting up a home video studio. But, I suggest you soundproof and treat your studio as much as possible.
- Soundproofing means isolating your recording space from unwanted external noise.
- Sound Treating means optimizing your recording environment to capture the best audio possible.
To soundproof your studio:
- Pick the quietest room in your house – preferably one away from the street to keep the levels of background noise as low as possible.
- Lay down carpets and rugs or affix sound curtains and blankets to the walls. Soft surfaces absorb sound better than hard surfaces.
- Close off any air gaps in the room.
- Stay away from noisy windows, fans, or appliances.
To sound treat your studio, invest in bass traps, acoustic foam tiles, and diffusers to optimize your recording studio.
Other equipment
If you’ve got the budget I highly recommend you get:
A mic arm: Nobody wants to hold their mic for hours, and a still mic means better-sounding audio.
Pop filters: This small screen that sits between you and your mic softens annoying "p" and "b" sounds.
Shock mounts: These mic attachments keep your mic steady and isolated from vibrations. No need to cut desk bumps and keyboard clicks out of your audio track.
Lighting: Natural window lighting is workable, but it’s best to have a lighting kit. You’ll have much more control, and you can record any time of day.
No matter what equipment you choose, I recommend you stay consistent to avoid tech issues.
What software do I need to record a podcast?
To record a podcast, you’ll need reliable recording software. Sometimes you’ll find the recording and editing suites combined in one application.
If you’re recording your podcast offline, you can record your audio directly into your editing application. But, if you’re recording remotely online, you need to record your podcast with something like Riverside.
When choosing software for a podcast recording, consider:
- Resolution: Records in at least 1080p video or 4K and 48kHz audio.
- Separate tracks: Captures each person on their own track for easier editing and less crosstalk.
- Ease of use: Simple setup — nobody wants to troubleshoot before every recording.
- Editing tools: Automatic editing tools like audio enhancement, filler word removal and layouts save you a lot of time.
- Local recording: For remote podcasts, get software that records each guest’s audio and video directly on their device — so bad Wi-Fi doesn’t ruin your quality.
- Guest-friendly: Easy for guests to join — no software downloads or tech headaches.
Best remote and online podcast recording software
I have a full post for you to compare the best podcast recording software and find the right one for you.
Though, if you’re looking to record remotely, Riverside covers everything you need.
Riverside

To check all the above boxes, try Riverside. You’ll get:
- High-quality resolution: Record your podcast in up to 4K resolution with uncompressed 48kHz audio.
- Local recording: Everything records directly to each guest's device, so bad Wi-Fi won’t ruin your quality.
- Progressive upload: Riverside uploads your recording to the cloud as you’re recording to save you time and keep your files secure.
- Remote guests: Invite up to 9 guests with a quick invite link.
- Separate tracks: Download individual audio and video tracks for each guest.
- AI editing: From text-based editing to automatic transcriptions and podcast clips — make editing fast and easy.
- Show notes: Get automatic podcast show notes, summaries and chapters straight after recording.
- Audience and Producer Mode: Include your production team and a live audience without accidentally recording them.
And much more, including a teleprompter, transcriptions, and even live streaming for a real-time show.
Whether you’re recording solo, with remote guests, or even on your phone, Riverside delivers studio-quality results without the studio price tag.
See how easy it is to record a podcast with Riverside. Sign up and start podcasting professionally!
Best software to record your podcast offline
Garageband
GarageBand is a great free option for Mac users. It’s easy to use and offers advanced audio editing tools at no extra cost. Just keep in mind — it’s Mac-only and audio-only, so if you need video, you’ll need a different tool.
Adobe Audition
This podcast software is best for professionals. The learning curve can be steep, but you have a huge variety of editing tools. It’s audio-only, and at $20.99/month, it’s more of an investment.
Hindenburg Journalist
Hindenburg Journalist is specifically for broadcasters but is also ideal for podcasters. It has direct uploads to podcast directories and support for uncompressed audio and all file formats. But it’s pricey (starting at $95/month), has a steep learning curve, and its editing tools aren’t as advanced as some competitors.
How to record a Podcast: 3 Methods
The best way to record a podcast depends on your setup.
If you’re recording in person, the process is a little different than recording with guests who are in different locations.
Here are different ways you can record a podcast:
- Record in-person with your equipment and a digital audio workstation
- Record in different locations via remote recording or online calling software
- Record from your phone
I’ll cover each of these in detail below.
How to record a podcast online from different locations (using Riverside)
Remote podcast recordings online give you greater freedom and flexibility without sacrificing quality.
It’s also the easiest way to record a podcast. Here’s how with Riverside:
1. Log in to Riverside
Riverside works on Windows, Mac, and mobile, so you can record from any device.
Log in, sign up for free, or start a subscription to get the most out of the platform.
2. Create your recording studio.
In your dashboard, click on the Studio list and then “New Studio” to create a place to record.
.webp)
Give your studio a name and select your recording type. Click “Create” to enter the studio dashboard.
Click “+New project”, and then select “Record”.
.png)
3. Enter your recording studio
You’ll enter the lobby, where you can select and test your podcast recording equipment. Select whether you are using headphones or not, and then when you are all set up, press “Join Studio”.

4. Invite podcast guests
If you haven’t already, invite your guests. Click the “Invite+” button on the top right bar.
Send your guests a link, or invite them via email.
You can invite audience members, guests and producers this way.
All they need to do is click the link to join.
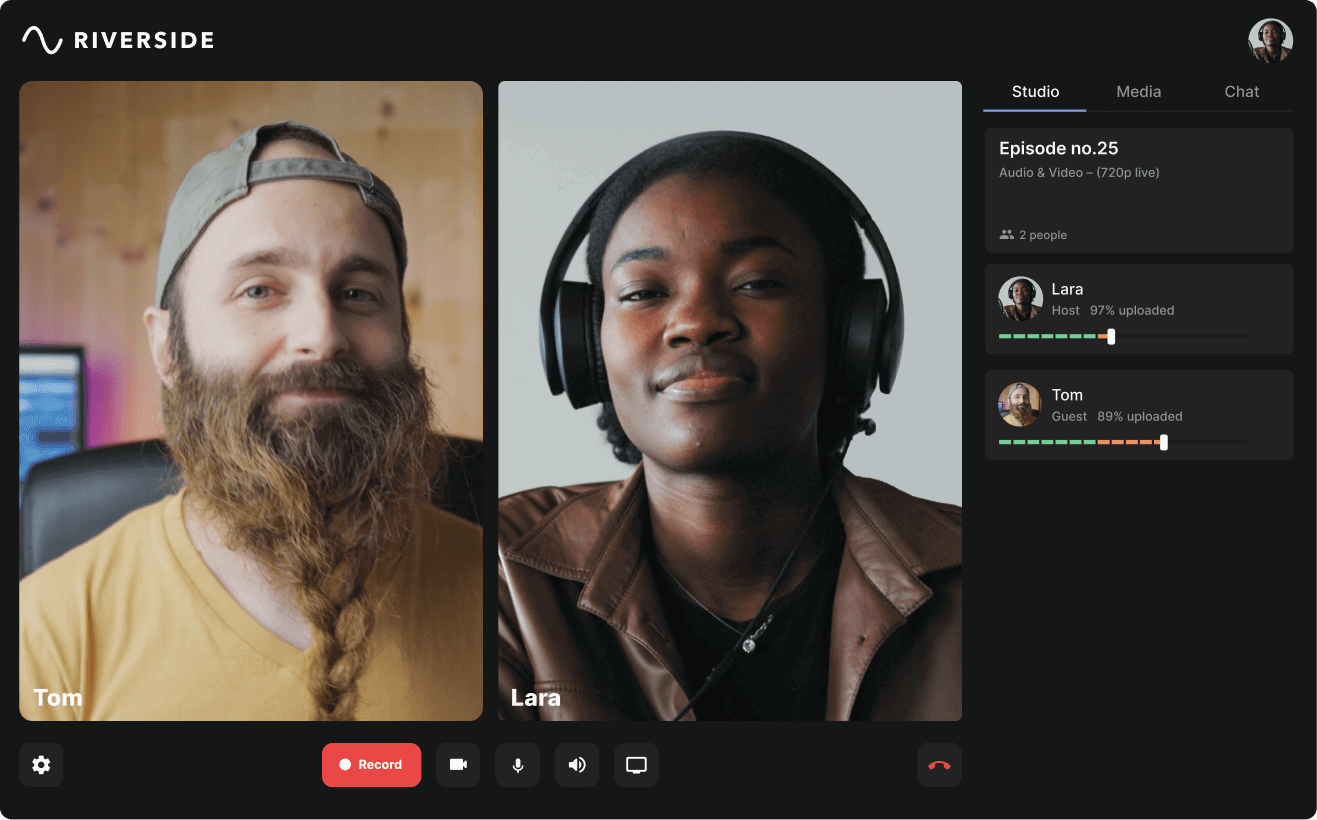
5. Start recording!
Once everybody enters the studio, click the big red record button and start your podcast recording.
.webp)
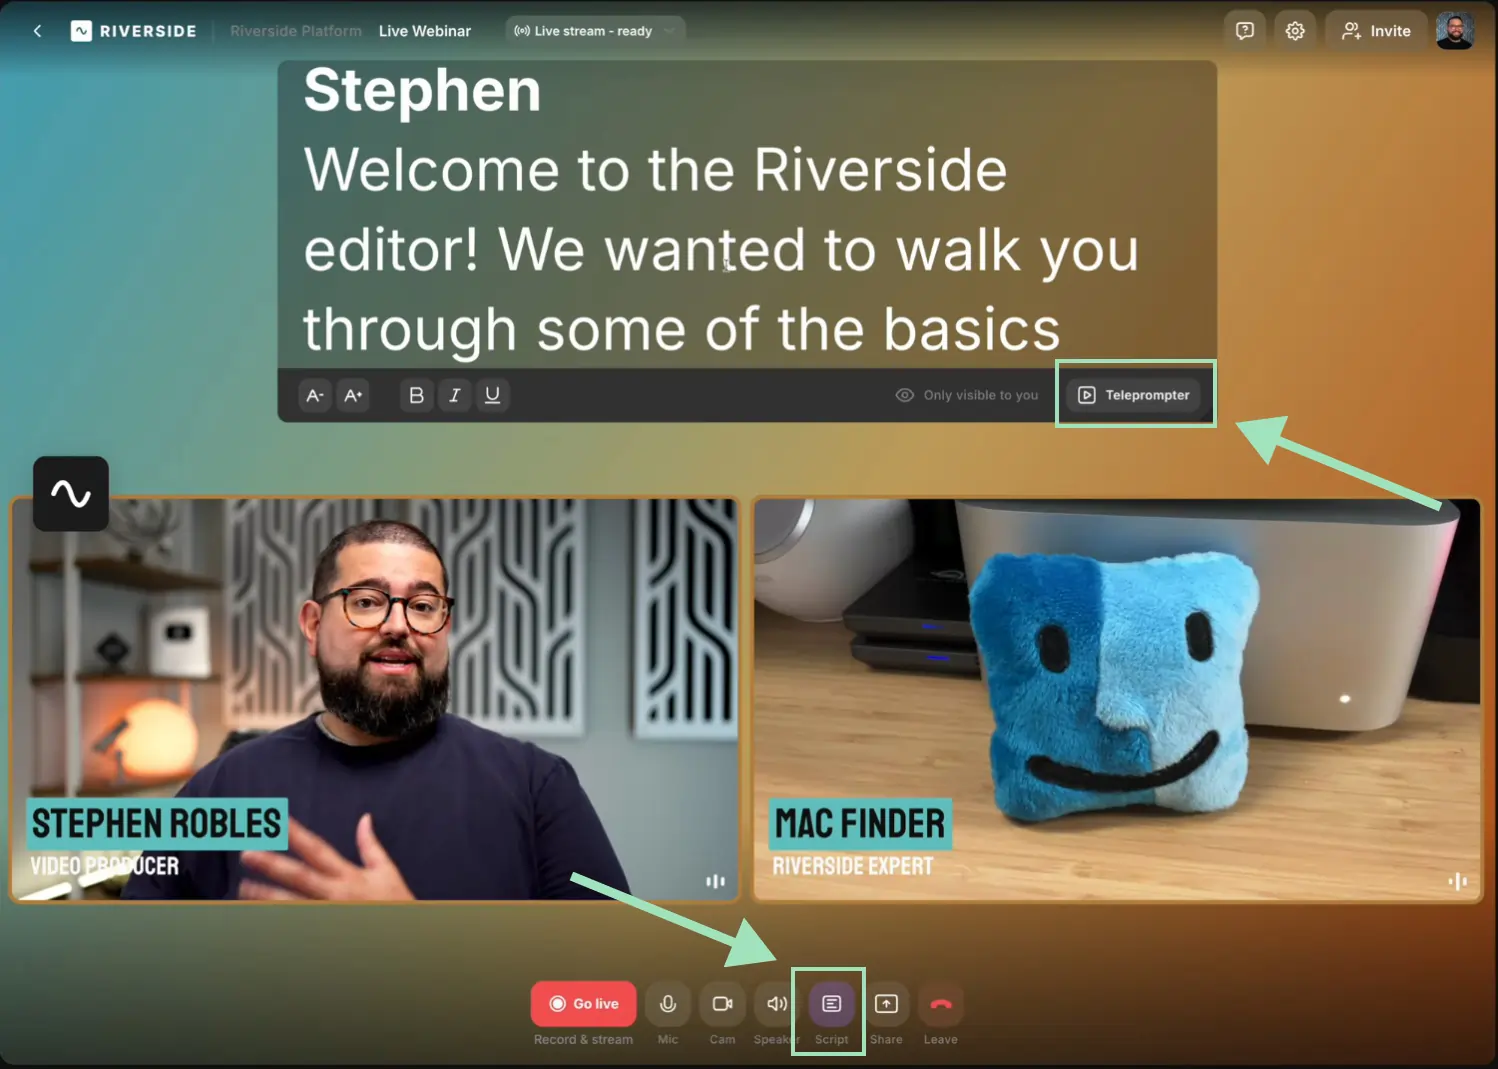
If you’ve got a script to follow, upload it to the teleprompter. Click the “Script” button in the bottom toolbar, then click “Teleprompter” button to paste your script.
You can use also the Media Board to add live effects.
Click the “Media” button on the right sidebar to access Riverside’s media board. Choose from the library or upload your own files
.
When you finish recording, click the stop button. Wait for all your files to finish uploading before moving on to our full-suite editor.
How to record a podcast interview offline
The best way to record a podcast with in-person guests is through an audio interface like the Focusrite Scarlett 2i2. An audio interface connects multiple microphones to your computer.
Follow these steps to record with in-person guests:
1. Set up your audio interface and headphones
Place the audio interface near your computer and plug it in. Connect each guest’s microphone to the interface. Then make sure each guest has their own headphones- also plugged into the interface.
The interface lets you capture separate guest tracks, making it easier to cut crosstalk later. Meanwhile, using headphones keeps everyone’s audio clean and avoids audio bleed.
2. Create separate tracks in your recording software
In your recording software, set up a separate track for each mic input so you capture everyone individually.
I like using AudioJack for this because I can combine it with Riverside for hybrid recordings. Here’s how:
3. Do a soundcheck
Have each guest speak normally while you adjust gain levels on the interface to get clear, even audio.
4. Set up your video angles (optional)
If you want to use a single camera, use one wide enough to capture both you and your in-person guests.
You can also set up multiple cameras with a video switcher. A video switcher lets you switch between camera angles live while recording.
Here’s how to set it up:
- Connect each camera to the switcher using HDMI cables.
- Connect the switcher to your computer via USB (most switchers show up like a webcam in your recording software).
- In your recording software, select the switcher as your video source.
- During recording, use the switcher’s buttons to flip between camera angles in real-time.
For example, here’s how I use my Atem Mini switcher with Riverside. Note that Riverside captures the switcher as a single track. You must add separate inputs directly to Riverside if you want separate video tracks.
How to record a podcast with a Phone
Recording a podcast with your phone is pretty much the same as one of the above options. There are many mobile recording apps you can choose from, and some, just like Riverside, allow you to record with guests remotely.
I suggest you find the right podcast recording app suited to your setup and I still suggest you use an external phone microphone to record with.
If you’re using Riverside you can record a podcast from both iPhones and Android devices. Simply follow the same steps as mentioned above on how to record a podcast remotely with Riverside. The only difference is that you’ll need to download the Riverside mobile app, and from there, you’ll be able to create your studio, invite guests, and start recording.
Podcast Recording Tips
1. Get comfortable with your own voice
Most podcasters hate the sound of their own voice at first — it’s totally normal. The fix? Record often and monitor yourself live with wired headphones plugged into your mic. This helps you get used to how you sound, improves your mic technique, and lets you catch minor issues (like tapping your desk) in real time.
2. Invest in your equipment & software
As far as possible, invest in reliable and high-quality equipment and software. Even budget podcasting equipment can make a world of difference to the overall quality of your recording.
3. Record in a quiet environment
Although there’s a lot you can do to optimize recordings, something you can’t control is background noise or interruptions. That’s why it’s always best practice to record in an environment that is as quiet as possible and away from distractions.
4. Don’t sweat the mistakes
Mistakes, errors, and blunders are virtually inevitable, so don’t let them phase you. If it’s a relatively small mistake, chances are you can glide over it and your listeners won’t even notice. If you’re a perfectionist, leave yourself an audio cue (such as a clap), so that when you look back at the recording during post, you know exactly where the error happened.
5. Wear headphones to record your podcast
This one may come as a surprise but wearing headphones during recording is highly recommended if you want to record high-quality audio. Wearing headphones will help you to monitor audio quality and to adjust your own mic positioning.

6. Prep your guest beforehand
Ensure to walk your guests through exactly what’s expected of them, what the structure of the episode will be, and address any queries they may have. Not only will this make sure they’re prepared, but will alleviate any nerves they’re having too.
7. Stay consistent with everything — gear, format, and schedule
Consistency is key to building your podcast and your audience. Use the same gear and setup every time to avoid tech headaches, stick to a regular release schedule, and choose a format you can realistically sustain — whether that’s a solo show, a weekly co-host, or interviews. The more consistent you are, the easier it is to stay on track and grow your audience past those tricky first 10 episodes.
What to do when you finish your podcast recording
Your next step is to edit your podcast recording. Trim and cut away filler words, set the narrative, and add your own podcast branding.
Editing your podcast
We’ve got a full guide on editing your podcast. But generally, this involves:
- Trimming out mistakes or long pauses.
- Removing filler words (“um,” “uh,” etc.).
- Fixing audio levels & removing background noise.
- Adding sound effects or music.
- Adding branding (for eg: logos, intros, outros, overlays).
- Creating chapters or segments.
- Adding captions for video podcasts.
- Creating short clips for promotion.
The podcast editing software you use depends on how much time you want to spend editing. If you’re an advanced editor and want fine-tuned control, consider using a tool like Adobe Audition.
But if you want to save time and polish your podcasts in minutes, then consider an AI-editing tool like Riverside.
Editing your podcast with Riverside
With Riverside, you’ve got all you need for a smooth and easy editing flow:
- Text-based editing: Trim your podcast as easy as deleting text in the recording transcript.
- Smooth timeline: Navigate with ease using our intuitive editing timeline. It color-codes speakers and has automatic chapters of your recording.
- Automatic podcast clips: Instantly turn your podcast recording highlights into short, shareable videos.
- Podcast branding: Customize your podcast with your logo, b-roll, music, and images.
- Dynamic captions: Add AI captions to boost accessibility & engagement.
- AI audio enhancement: One click to remove noise, normalize levels, and polish sound.
- Filler word removal: Instantly cut “ums” and “uhs” to tighten your audio.
- Set the pace: Remove those long awkward silences for a faster pace.
.webp)
Create your podcast cover art
Some podcasters use the same cover throughout. But, for that extra touch design cover art for each episode that highlights the topic or guest.
Episode covers help grab attention - especially on social media or YouTube. You can create these yourself using tools like Canva or work with a freelancer if you want a polished look.
Read more: 12 Tips on How to Make Podcast Cover Art That Works
Produce your show notes and podcast transcription
The essential final touches for any podcast should be your show notes and episode transcription.
Show notes give your listeners a summary of your episode and what they should expect.
Podcast transcripts make your content more accessible and open to new audiences. They also help you to promote, market, and re-use your podcast more effectively.
Top tip: On Riverside, you can download automatic AI show notes and transcriptions straight after recording.
Upload your show to a podcast hosting software
Once you’ve edited your podcast, you’ll need to upload it to a podcast host such as Buzzsprout or Spotify for Podcasters.
If you’re using Riverside, use our Spotify for Podcasters integration for a smooth workflow.
Submit your podcast to directories (Spotify, Apple Podcasts, etc.)
From your host, distribute your show to all the major listening platforms. Many hosts automatically submit your content to Apple Podcasts, Spotify, Overcast, etc., so you don’t have to worry about it.
Check whether your podcast host has this feature or not, and if they’re missing out on a particular platform, ensure to submit your podcast manually.
Give yourself a pat on the back - you did it!
You recorded a whole podcast episode - congrats. Savor the moment, acknowledge your accomplishment, and get ready to do it all over again. Podcasting is addictive - this is only the beginning of your journey!
FAQs about Recording Podcasts:
How can I use my browser to record a podcast?
Long story short, use Riverside. Riverside makes recording a podcast from your browser seem like a complete breeze. There’s no need to download any additional application, and your guests don’t even need to sign up or make an account. Simply open Google Chrome and start recording!
What do I need to record a podcast at home?
All you need is a microphone, headphones, computer, recording software, and yourself. If you want to include guests in your podcast, try using Riverside.
How long does it take to record a podcast?
There’s no correct answer to this question. Timings vary from podcaster to podcaster. Some run a very tight and efficient operation. Others may prefer to take their time and get to the nitty gritty edits.
On average it can take around double the time of your final episode.
How do I record a podcast on an iPhone?
Recording your podcast from an iPhone just got easier. Riversides mobile app is not messing around - it’s a recording studio right in your pocket!
How do I record a podcast with two 3.5mm microphones?
In order to record with two 3.5 mm microphones, one option is to get yourself a stereo splitter. The only problem with doing this is that the two microphones, and therefore two sources of audio, become one recording. This can make editing your recording more difficult.
Can you record a podcast with AirPods?
Technically, yes you can record a podcast with AirPods. Objectively speaking, they’re not the best choice.
The AirPods microphone, whilst decent for phone calls, just does not live up to the caliber of a proper studio microphone. As a result, you’ll get a lower quality recording which will dampen the overall production quality of your podcast.
How to record a podcast on Zoom?
Considering Zoom’s popularity it's also used by some for recording podcasts. In general, you can record Zoom meetings which you can use for podcast recordings. Although, keep in mind that Zoom records everything online and that recordings are susceptible to faulty internet connection.
I have a blog post that goes into full details on how to record on Zoom, but in general you can follow these steps.
- Set up a Zoom meeting and invite guests
- Click on the settings gear and choose the Recording tab
- Adjust as desired and choose where you want to save your recordings
- Start your Zoom recording and click on the Record button to record.
Where can I record a podcast for free?
Fortunately, many of the software listed above lets you record a podcast completely for free. Some options you can look into to for free podcast recording software include:
- Riverside
- Audacity
- GarageBand
- Anchor


.png)