.webp)


Table of contents:
Staring at your screen, wondering how on earth to get started with your first webinar? I’ve been there.
All that planning, choosing software, and somehow making it engaging and authoritative – plus a million other moving pieces. It’s rough. Or, at least, it could be rough.
Breathe. We got you.
This is your ultimate, no-nonsense webinar survival guide – every step, zero fluff. Just the exact moves you need to create a webinar people won’t snooze through.
Let’s do this!
Key takeaways
- Webinars are marketing gold: They bring in leads, boost your brand, and establish you as an authority.
- Pick the right webinar type (seriously, it matters): The right format keeps your audience engaged and actually showing up.
- A well-planned webinar is the best webinar: Nail your topic, structure it right, and make it interactive. A little prep goes a long way.
- Your platform can make or break it: Professional, high-quality audio and video make all the difference. Use a platform like Riverside for 4K video, 48 kHz audio, and AI-powered editing tools.
Don’t let your webinar collect digital dust: Webinars are a content goldmine you can slice up into blog posts, social clips, and more.
How to create a webinar in 5 easy steps
Creating a webinar doesn't have to be rocket science. Here’s a step-by-step guide to getting the job done. Let’s start with planning.
Step 1: Plan your webinar
A successful webinar starts with a rock-solid game plan. Here are the key things to consider:
Choose the right type of webinar for your audience
Not every webinar format works for every audience. After all, not everyone wants to wake up at 3 a.m. for your "live interactive session.".
Some webinar formats you can choose from include;
Live webinars
Live webinars happen in real-time, encouraging a lively chat with audience members. The only risk is if your Wi-Fi ghosts you mid-session, you’d better have a backup plan.

On-demand webinars
Think of on-demand webinars as an always-on database of your webinar content. Record once, then let people watch whenever they want. They’re perfect for tutorials and educational sessions that don't need real-time chat.
Evergreen & automated webinars
Pre-record your best content, add some automated interactions like simulated chat, polls, and Q&A, and let it run on repeat. Evergreen webinars are great for lead generation, but can feel less personal.
Hybrid and simulive webinars
Want the best of both worlds? Pre-record your main content, polish it to perfection, but stick around for live Q&A.

Here are a few questions you might ask yourself to pick the best type of webinar for your goals:
- Is your audience craving real-time interaction? A live or hybrid webinar might be best.
- Do they want content they can access any time? → Consider an on-demand webinar or evergreen webinar.
- Is your goal lead generation or sales? → A simulive or automated webinar can help scale your marketing.
Pro tip: Instead of playing the guessing game, just ask your audience what they prefer. A quick poll in your email newsletter or social media is all you need.
Nail down your webinar topics
Let’s be honest: Nobody wants to attend another generic webinar about “synergistic opportunities.” You need something that makes people think “I should cancel my dentist appointment for this.”
Here's how to find that golden topic:
- Review audience pain points: Dig into your support inbox. What questions keep coming up? What keeps your customers up at night?
- Analyze industry trends: Identify the emerging topics by diving into LinkedIn discussions, Reddit threads, or anywhere your customers might be talking.
- Check competitor webinars: Check what your competitors are doing, then do it harder, better, faster, and stronger than them. Want to walk the extra mile? Fill the gaps they’re missing.
- Review past content performance: Find out what worked, and what didn’t. Then try to understand why. Or, just ask your audience for their thoughts.
Pro tip: Your webinar shouldn’t just ask the big question: “Will AI take my job in a year?” It needs to deliver a real, practical solution: “How to integrate AI into your workflow and boost productivity 100x.” Hook them with curiosity, keep them with value.
Define your goals
Set real goals, and be specific. Outline what the purpose of this webinar is, and what people should be able to do.
If its sole purpose is "understand the power of [your product]," try again. You need to look for actual, tangible outcomes.
For example:
- What problem are you solving for them?
- How does your product or service actually fix that problem?
- What makes your solution different (and better) than what your competitors offer?
- What unique, can’t-Google-this lesson will they walk away with?
- What are you giving them that will make them think “This was absolutely worth an hour of my time”?
Write down 3-5 concrete takeaways. If you're struggling with this part, your topic might be too broad.
Step 2: Prepare your webinar
Once you've picked your topic and format, start preparing your webinar. This means it’s time to prep the content, structure, and materials needed for a spot-on presentation.
Let's break this down.
Define your webinar structure
Structuring a webinar is like curating the perfect dining experience – every course needs to be served in the right order.
Here’s a foolproof recipe for a five-star webinar: (Download the PDF template)
Introduction (5-10 minutes)
- Welcome attendees and break the ice.
- Show them who you are.
- Give them a roadmap of what's coming and set expectations. Hook them in!
- Throw in a quick poll or question to wake everyone up.
Main content (20-40 minutes)
- Present your core message with a clear, logical flow.
- Tell stories that actually matter. Drop truth bombs backed by real, verifiable data.
- Use visuals, case studies, and real-life examples.
- Keep the slides moving.
- Smooth out transitions and make good use of sound and music.
Audience Interaction (5-15 minutes)
- Start by addressing the elephant in the room (you know, those objections everyone's thinking about).
- Make the webinar interactive and conduct a live Q&A session.
- Run those polls you've been sitting on.
Call to Action (5 minutes)
- Wrap it up and remind your audience why all they’ve heard so far truly matters.
- Make them feel special by giving them something special, such as an exclusive discount or free resource.
- Avoid a dreadful "thanks for coming" followed by an awkward silence. Just tell them exactly what to do next (e.g., sign up, download, or purchase).
Pro tip: Mix things up: some stories here, some stats there, and enough visuals to keep their eyes from glazing over. Nobody ever complained that a webinar was too engaging.
Decide whether to include guest speakers
The right guest speaker can turn a solid idea into a knock-out event.
Here's who to consider:
- Industry experts who provide insights beyond your expertise.
- Customers or clients who can testify that your product really stands out from competition.
- Team members who can demo features without boring everyone to tears.
Tips for coordinating with guests:
- Reach out at least 2-4 weeks in advance to confirm availability.
- Clearly outline expectations, including the topic and speaking duration.
- Schedule a practice session to ensure a smooth presentation.
- Provide any necessary slides, talking points, or technology guidelines, or ask if they want to create something on their own.
Tip: If your guest is new to webinars, offer to moderate the discussion to keep it flowing naturally.
Bonus: If you want a hand booking an amazing guest for your webinar, check our community guide to booking dream guests.
Prepare your webinar script and talking points
Going scriptless in a webinar sounds like a great way to keep it spontaneous and authentic … for about five minutes. Then come the awkward pauses, the rambling, and the inevitable train wreck. Instead, do this:
- Write a strong opening script that will make your attendees think sitting through your entire webinar is worth their time.
- Prepare a bullet-point webinar outline for each key section so you can hop over all those rabbit holes.
- Craft smooth transitions between topics.
- End with a bang. Have a closing script that leaves them wanting more, and wrap up everything with a compelling call to action.
Pro tip: Don’t read your script word for word. It should be like your GPS – there to guide you, not control your every move.
Prepare visual and multimedia materials
Let's put it bluntly: nobody wants to stare at text for an hour. Your audience is probably multitasking while they casually listen to your webinar. Your slides need to be so good they actually close their email. Here's what you need:

Presentation slides:
- Use minimal text and high-quality images. As a rule of thumb, keep text shorter than a tweet.
- Stick to a consistent color scheme and font style for a professional look. Take advantage of branding options to make sure your webinar looks like you.
- Highlight key points with punchy bullet lists rather than paragraphs. A joke here and there will keep your presentation fresh.
Videos & other media:
- Pre-record any demonstrations to avoid technical glitches.
- Drop in video clips that add value and help you tell a story.
- Use engaging charts, infographics, or screenshots to illustrate data.
- Make sure images are high resolution and look like they were taken this decade.
Downloadable resources:
- Prepare PDF guides, templates, or worksheets that attendees can take away. Make sure they’re useful, not just pretty.
- Create a landing page or follow-up email for easy access. Nobody will remember (or care about) links shared in chat.
Pro tip: The only thing worse than a boring webinar is a broken one. Test your camera and your microphone, as well as everything else you’ll be using. Then test it again.
Step 3: Choose the right webinar platform
It’s time to choose your webinar platform. This is a key step to creating a high-quality presentation. Here’s what to look for, and here’s how we check those boxes.
What to consider for webinar software:
High-quality resolution
Your audience deserves better than a webinar that looks and sounds like it was recorded on a 1996 VHS tape.
Reliability & stability
Glitches happen — from Wi-Fi drops to unexpected freezes — but your webinar shouldn’t suffer because of it. Choose software that’s built for stability.
And if you’re recording your webinar, use a platform which records locally. This means everything records directly to your device so your recordings stay safe and high-quality no matter what happens to your internet.
Ease of use
Hosting a webinar shouldn’t be rocket science - neither should attending one. Look for a webinar platform that keeps things simple.
Guest speaker integration
Keep things easy for guests so they can focus on their area of expertise - and their presentation.
Audience engagement tools
Keeping a live audience engaged is no small task. Look for platforms that provide some tools like breakout rooms, Q&As, and polls.
Easy repurposing
Your webinar shouldn't be a one-and-done deal. Look for a tool that makes content repurposing easier. For example, look for automated editing tools or features that can help you create clips and other types of posts.
Best webinar platforms

We’ve got a whole list of webinar platforms in our guide. But, you’ll see that Riverside the ideal platform if you’re looking to record, edit, and host webinars in one place.
You’ll get:
- 4K video & 48kHz audio: Crystal-clear quality, even if your Wi-Fi drops, thanks to local recording.
- Live stream to multiple platforms: Broadcast your webinar on YouTube, LinkedIn, Facebook, and more — all at once.
- Custom branding & layouts: Add your logo, colors, and overlays to make your webinar match your brand.
- Live audience call-ins: Let audience members join the conversation live with call-in functionality.
- Slides & screen sharing and recording: Present directly from Riverside, with slides and screen shares saved as separate tracks.
- OmniChat & audience engagement tools: Manage chat across platforms from one place and run live polls and Q&A.
- AI-powered post-production: Instantly generate transcripts, summaries, and short highlight clips to turn your webinar into social posts, podcasts, and more.
With Riverside, your webinar isn’t just a live event — it’s high-quality content you can repurpose everywhere.
Step 4: Run your webinar
Next up, running your webinar. Let’s break it down step by step and make sure your show runs smoothly. We’ll show you how to do this with Riverside as an example.
Schedule your webinar
Schedule your webinar at least two weeks ahead of time. This will give you time to promote it.
If you’re using Riverside, click on the studio you want to host your webinar in, and in the dashboard, click "Plan," and choose “Schedule Session.” (You can learn how to create a studio here.)
Here you can fill in all the details and start sending invites to all your attendees as well as guests and even producers. You can also create a customized audience registration form to help you gather key details about your registrants.
Plus, Riverside integrates with HubSpot to help you track all the leads you capture.

Promote your webinar
Once your webinar is scheduled, it’s time to build excitement and drive attendance. Here are a few tips:
- Share the registration link on social media, email, and sitewide.
- Set up those "don't forget about us!" reminders as the event approaches.
- Rope in some influencers and partners, and ask them to cross-promote your content in their channels.
- Use HubSpot to connect with your CRM and scale your promotional efforts with automation.
Riverside gives you the flexibility to adjust your invites and registration page as needed, ensuring you get the most out of your promotional efforts.

Practice and technical setup
Don’t just jump in front of the camera and assume it’ll be fine. Practicing both your on-camera performance and your technical setup will go a long way to ensuring a successful webinar. Here are a few tips to help ensure your presentation runs smoothly:
- Practice makes perfect: Rehearsing your webinar is essential to smoothing out any rough edges. I recommend doing at least one dry run just like to plan to on the big day.
- Do try to relax: Prepare thoroughly in advance, but then just let go and trust in yourself on the day of the webinar.
- People love stories: Real-life anecdotes work better than case studies to illustrate your points. They are easier to remember and can make your content more relatable.
- Consider calling a pro: If you can’t stop your hands from shaking when presenting, you might want to hire an industry expert or enlist a team member with public speaking experience.
Next, let’s make sure your technical setup is solid before going live:
- Find a quiet spot: Background noise is distracting and unprofessional. You may not have a studio, but you can still do a lot to set up your space so that it sounds like a studio.
- Get your gear sorted: Check your internet connection, laptop (or desktop), camera, headphones, and microphone before you start. Yes, even if “everything was fine yesterday.”
- Look at what’s behind you: If you’re not using a virtual background or green screen, make sure your space is neat and tidy. Your lighting should be bright and professional too.
Pro tip: We’ve reviewed some of the best headphones, microphones, and camera webinar equipment to help you create the best setup.
Set up your webinar software
Make sure your webinar platform is all set for your event. With Riverside, you can do the following:
Brand your webinar studio
Start by setting up your own digital stage by taking advantage of our branding options.
Enter the studio where you’ve scheduled your webinar. Go to the studio dashboard and click “Record”. In the lobby, then select “Join studio”
Now in the studio, click the “Brand” icon on the right sidebar. You can choose your colors, custom background, and logo.

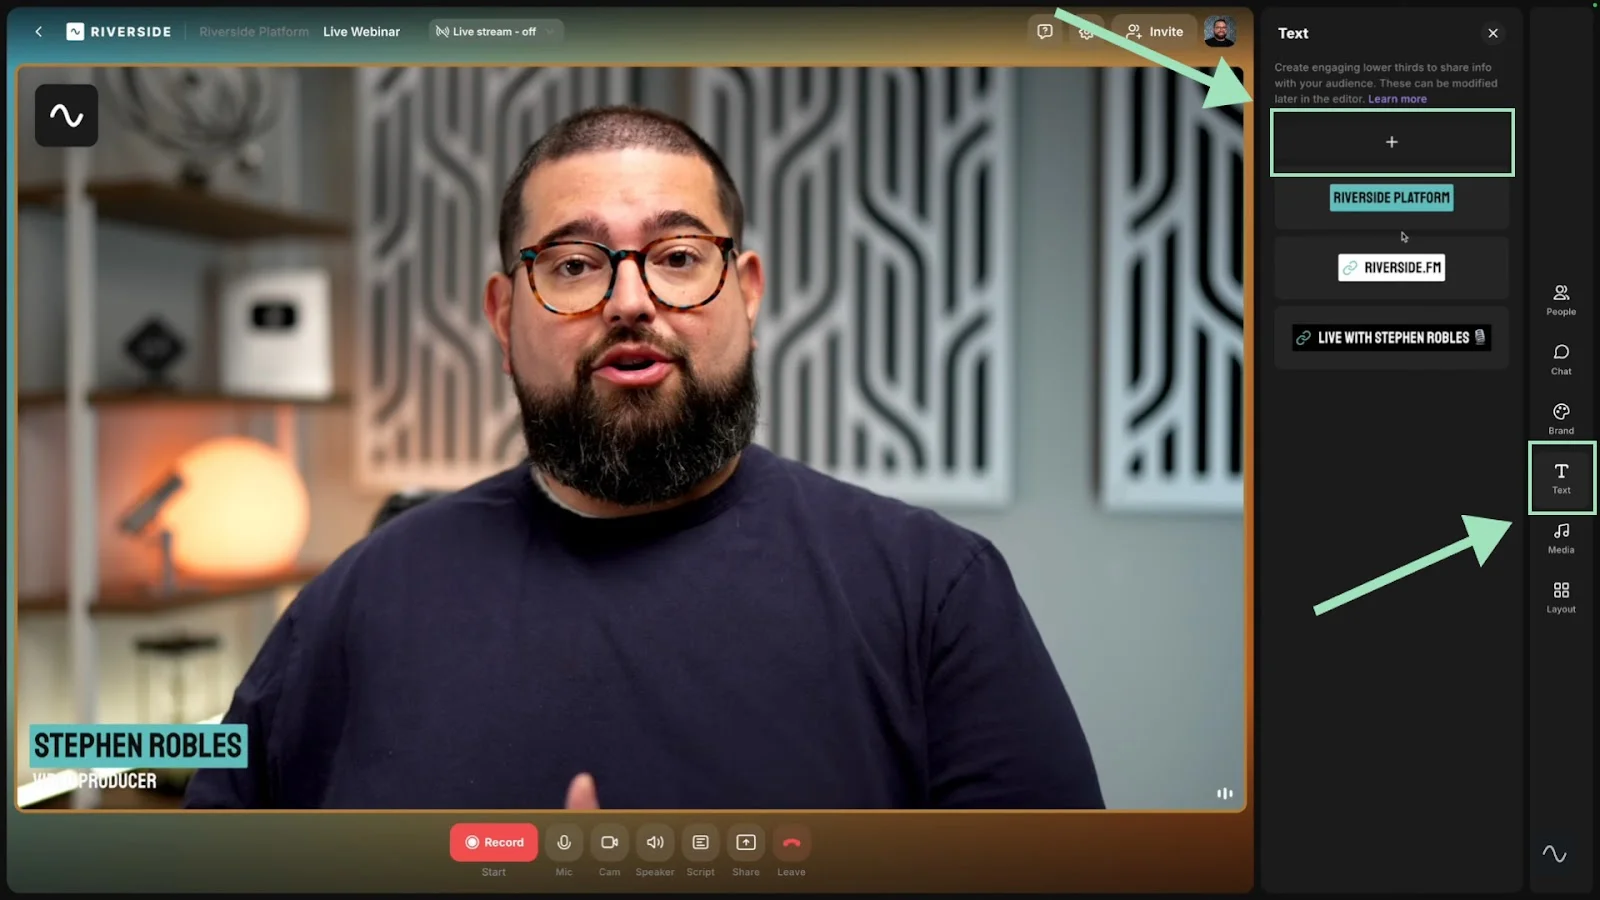
You can also create fancy lower thirds. Use them to share speaker names or other key information, such as website addresses or social media handles.
Click on the “Text” icon on the right sidebar, then on the plus “+” icon to add a new lower third.
Upload scripts and slides
Still feeling unsure about your outline? Paste a script in the Riverside teleprompter.
Click the “Script” button at the bottom to open the script window, then click the “Teleprompter” button to have Riverside scroll the script.

You can also upload your own slides instead of sharing your screen each time. Click on the “Share” button and select “Presentation” to upload and your slides.
Host and record your webinar
Once you’re in your recording studio and everything is set up, you’re ready to go live.
Click on the Live stream-off button on the top of your screen. A menu will appear. You can select what platforms you want to stream your webinar to.
Then when you’re ready, hit “Go live” in the studio, and you’re rolling.

While running your webinar you can:
- Engage your audience. Use the omnichat and live call ins to chat with your viewers.
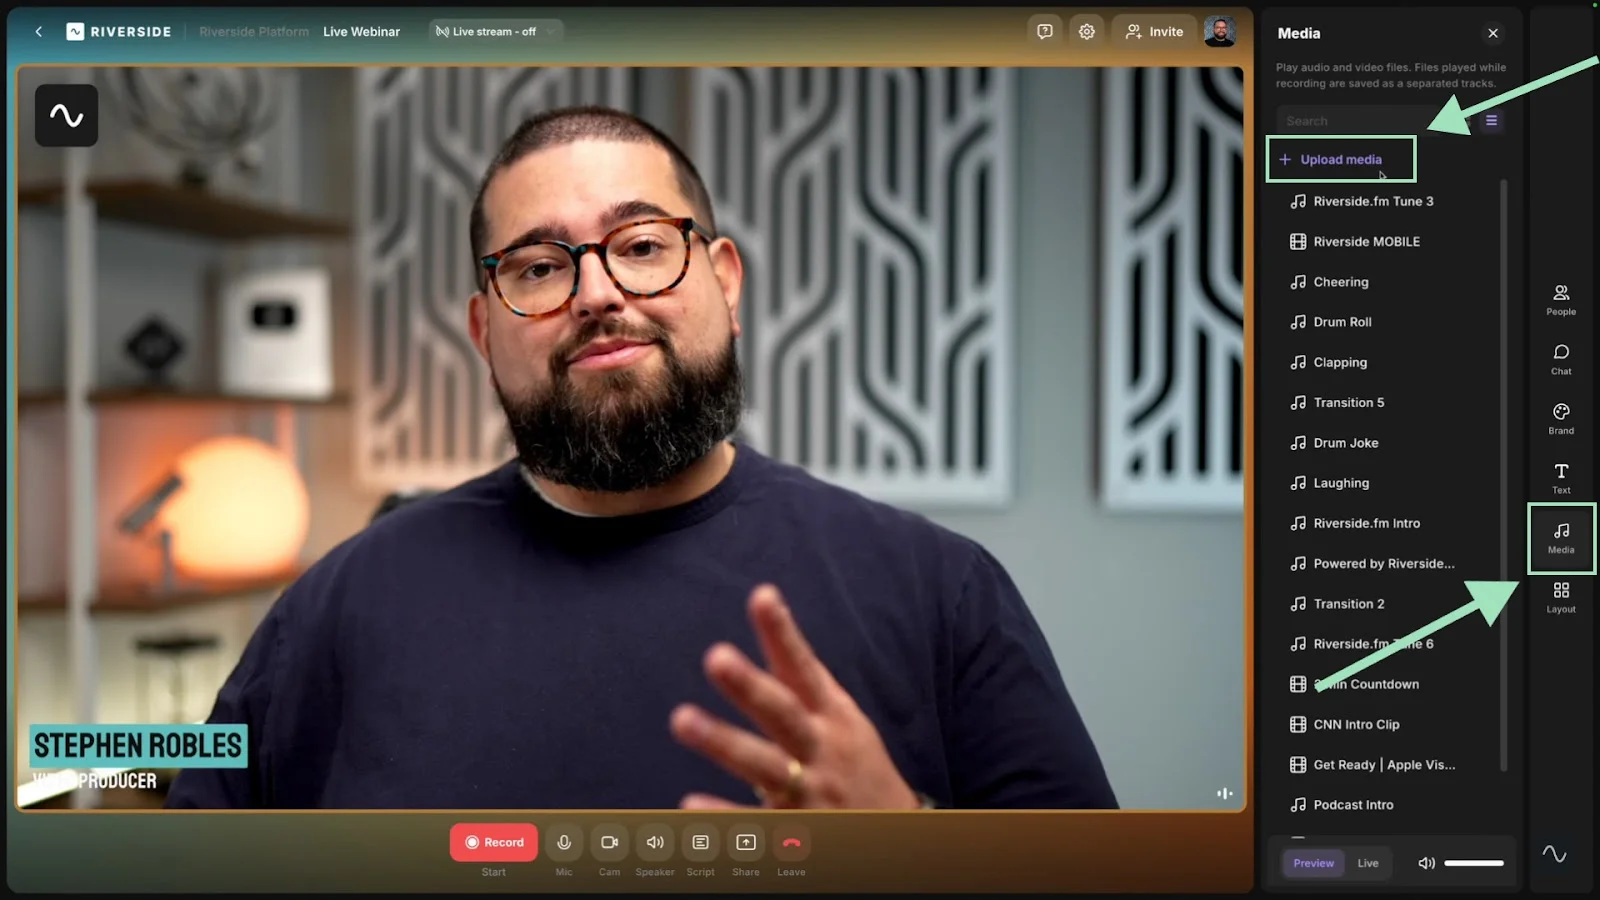
- Add live media: Click the “Media” button on the right sidebar to access free sound effects or to upload your own audio tracks.
- Change up your layout: Just click the “Layout” button in the right sidebar or use keyboard shortcuts to switch layouts during the webinar.
Step 5: Repurpose your webinar
Your webinar may be over, but if you’ve recorded it, there’s lots you can do to repurpose it.
Turn your webinar into on-demand content
Use Riverside’s AI video editor to polish your recording into an on-demand webinar. Clean up your audio, remove filler words, trim unnecessary sections, and add captions, branding, and overlays — all in a few clicks.
Pair this with our our AI summaries for a quick on-demand webinar post description, chapters, and title.
Send the recording to anyone who missed the live event
Don’t let all that content go to waste — email the edited recording to registrants who couldn’t attend live.
Create social media clips
Use Riverside’s Magic Clips feature to turn your webinar recording into multiple social media posts. Set your speaker, clip length, and keyword focus; then our AI will find the key moments of your recording and turn them into shareable clips.
Turn your webinar into a blog
Use Riverside’s AI-generated transcripts and show notes as the base for a blog post or article. Add context, polish it up, and publish.
Why should you create a webinar? 12 webinar benefits
If you're wondering if webinars are worth all the effort, the short answer is: yes. Let’s look at some of the reasons why creating one can be helpful to your business.
Easily reaches a worldwide audience
With webinars, your expertise can reach new customers from across the world - no plane ticket required.
Establishes you as an authority
The mere act of hosting a webinar positions you as an authority in the field. If the webinar is especially informative, with unique-never-before-seen information, you're not just an expert – you're a pioneer.
Makes creating new content easy
A webinar needn’t be a one-time event. You can repurpose it into blog posts, social media clips, online courses, and podcasts.
Serves as evergreen content
Even after the live session is over, your webinar's value doesn't end there. Turn it into on-demand content, so that more people can discover and learn from you while you sleep.
Generates leads and drives conversions
The registration process for a webinar naturally collects contact information, giving you access to the most precious commodity in marketing – a person’s inbox. Plus, if your webinar is value-packed, it’s more likely to convert all those warm leads into hot buyers.
Fuels your marketing strategy
A webinar is like having a focus group, an analytics platform, and a survey all rolled into one. Track engagement and attendance metrics, field questions, run polls, and harvest valuable intel to fuel your marketing strategy.
Provides instant feedback for your business
No more guessing what your audience thinks. Your attendees can tell you directly - live on the call - what they like or dislike about your offering.
Effectively demonstrates products or services
Nothing beats showing how your product works in real-time. A webinar is the ultimate way to showcase your best features with actual demonstrations and walkthroughs.
Delivers cost-effective marketing
Webinars are very cost-effective, especially compared to organizing an in-person seminar or event. No venue rentals, no catering bills, no travel expenses. Just you, your audience, and a solid internet connection.
Builds a loyal community
Every webinar is a chance to build a community that actually cares about what you do. Those Q&A sessions and live chats are incredible for building relationships that last way longer than your event's runtime.
Boosts brand awareness
People may know nothing of your brand, but they could join your webinar for the unique perspective you’re offering. When you nail it, attendees become your own social media managers, sharing your event with their networks and snowballing your reach and brand visibility.
Enhances customer retention
Regular webinars are like VIP events for your customer base. Drop some exclusive insights, teach them something new, make them feel special, and watch your retention rates soar.
Incorporating Interactive Elements: How to create engaging webinars
Webinars don't have to be boring, with the host talking for hours on end. Here’s how you make a webinar more interesting.
- Use Visuals: Visual aids like slides, images, graphs, infographics, and videos can make your content more appealing and easier to understand. They can help you explain complex topics and keep your audience engaged.
- Keep it Interactive: Engage your audience throughout the webinar. You can use tools like polls, quizzes, or live chats to make your webinar more interactive. Encourage your audience to ask questions or share their thoughts.
- Tell Stories: People love stories. They are easier to remember and can make your content more relatable. Use case studies or anecdotes to illustrate your points.
- Use breakout rooms: Breakout rooms can drive interaction and help people feel like they’re part of a community. These can also increase people's trust and loyalty to your brand.
- Real-Time Annotation: Some webinar platforms allow the presenter to annotate their screen in real-time, highlighting important points or guiding the audience's attention.
- Live Chat: Encourage participants to use the chat function to comment, ask questions, provide feedback, and interact with each other.
FAQs on how to create a webinar
Still looking for information? Here are the answers to some frequently asked questions.
Can participants speak in a webinar?
Usually, no. Most webinars keep attendees on mute to avoid absolute chaos (imagine hearing the audio of 500 people at the same time). But if the host allows it, participants can be invited to speak during Q&As or use chat and polls to engage.
What is the best free webinar platform?
Many platforms allow you to create a webinar for free. For example, you can leverage the free versions of platforms such as Riverside or Zoom to run your webinar. However, free versions often have limitations, so check each company's pricing page to find a free option that meets your needs.
Is Zoom Webinar worth it?
Zoom is a solid platform, but there are more Zoom alternatives out there than people think. One downside of Zoom is that Zoom Webinars can be very pricey. Hosting larger meetings with full features can cost thousands of dollars. Sure, it’s easy to use and you’re likely familiar with it already, but it doesn’t provide much beyond a vanilla experience. If you want a webinar platform that’s easy to use, very affordable, and can record in full HD audio and video quality, look no further than Riverside.


.png)
-(1).png)

.png)
.png)

